
The Best Pour-Over Setup for Making Great Coffee at Home
Making pour-over coffee feels is so simple yet so satisfying. You control the water, watch the bloom rise, and enjoy fresher flavor than any run-of-the-mill coffee maker can create.
It works in tiny kitchens, in dorm rooms, and in office spaces, as long as you have a small gooseneck kettle nearby. The best pour-over setup doesn’t have to cost much.
A quality dripper like a Hario V60 or Kalita Wave, fresh coffee beans, and a digital scale can easily transform your morning routine into a meditative ritual you look forward to.
Choices matter, though. One brewer leans bright and sweet, another leans smooth and calm. Let’s explore how you can find the best pour-over setup for your tastes.
Best Starter Setup
Starting simple helps you learn the brewing process without stress. This setup gives you plenty of control, great taste, and a low price tag. You get that fresh café feel without the cost.
What You Need:
- Hario V60 Dripper: Light, easy to clean, and well-loved by home barista fans. The cone shape helps the coffee grounds drain smoothly, resulting in a bright, balanced cup.
- Basic gooseneck kettle: The narrow spout helps control your flow rate. Even a budget electric kettle works if it pours gently enough.
- An affordable burr grinder: Grinding right before brewing keeps your coffee beans fresh. A burr grinder produces a more consistent coffee grind than a blade grinder, which supports better extraction.
- Paper coffee filters: They keep grit out of the cup and help create a clean flavor. Hario filter paper fits perfectly here.
- A simple gram scale: A small digital scale keeps your coffee-to-water ratio steady. Even cheap scales beat guesswork.
Quick Brewing Walkthrough
Rinse the paper filter to warm your glass cup or carafe. Add ground coffee to the dripper and tap to level the coffee bed.
Pour a little hot water to start blooming, just enough to wet everything. Wait for the bloom to release gas.
Pour the rest of your water slowly in spirals, keeping the coffee bed covered. Let it drain, then enjoy a smooth cup of pour-over coffee.
Small tools, big taste. This setup gives you a solid start and leaves room for upgrades only when you feel ready.

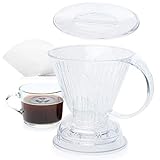
Best Flavor-Focused Setup
If you enjoy a cup that tastes smooth, sweet, and almost tea-like, this setup is for you. It highlights clarity and brings out gentle notes you might miss with a faster dripper.
What You Need
- Chemex brewer with a glass carafe: The wide brewer shape slows the brewing process a little. That extra time helps the water pull more flavor from the coffee grounds while still keeping the cup clean.
- Thick paper filter: Chemex paper coffee filters remove tiny particles that might slip through regular filter paper. This leads to a bright and clear finish without sediment.
- A high-quality burr grinder: Better grinding gives better extraction. Fresh ground coffee will always beat pre-ground coffee when you want to taste fruity or chocolatey notes in full detail.
- Control of coffee grind size and water temperature: A reliable scale and kettle keep your brew method steady. Aim for a medium coffee grind and a hot, but not boiling, water temperature to avoid bitterness.
Why This Setup Shines
The coffee bed drains evenly, so flavors stay balanced. Pour slowly from a gooseneck kettle to keep the flow rate steady.
You’ll feel like a barista, yet the method stays calm and forgiving. With a Chemex, the cup tastes smooth enough to sip black, even if you usually reach for milk.

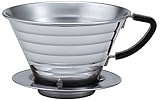
Best Compact Setup
Small space shouldn’t mean small flavor. This setup fits into a backpack pocket, a drawer, or a carry-on.
This is ideal if you brew in a tiny kitchen, an office corner, or a hotel room. You still get great pour-over coffee, just with gear that stays light and easy to use.
What You Need
- Kalita Wave Dripper: Flat bottom for an even coffee bed, gentle extraction, and a cup that stays smooth without fussing over technique.
- Travel electric kettle or manual kettle: Packs light and keeps your flow rate under control for a good bloom and a steady pour.
- AeroPress as a bonus: Not a pour-over brewer, but it’s compact, fast, and brews tasty coffee anywhere—a fun backup tool for long trips!
- Clever Coffee Dripper as another tiny option: Combines immersion and pour-over style brewing. Drop the filter, add coffee grounds and water, wait, then release. Easy cleanup always wins points.
Why This Setup Works
The Kalita Wave handles brewing method details for you. Even if you’re half-awake while grinding, the coffee bed drains evenly, ensuring dependable extraction.
Toss everything into a small pouch, and you’re basically a traveling barista. Easy sip, zero clutter.

Best Premium Setup
If you want something that feels close to a coffee shop experience at home, this setup brings precision and a smooth brewing process. It adds comfort, consistency, and a nice “treat yourself” mood to your morning.
What You Need
- Stagg EKG Kettle: Easily set your water temperature and keep a steady flow rate. The gooseneck spout makes blooming and slow pours feel controlled and calm.
- Upgraded dripper, such as a high-end Hario: Premium materials hold heat better. That’s why the extraction stays steady from start to finish.
- A fancy brewer for that café feel: A Chemex or a polished Hario setup looks beautiful on the counter and delivers rich, clean coffee with minimal effort.
- A digital scale with fast readings: Quick-read numbers help keep your coffee-to-water ratio locked in so your cup tastes the same every day.

Why This Setup Feels Special
You get the fun of manual brewing with tools that make the small details easier. Your kitchen becomes the brew bar, and you become the barista who always gets your order right.

The Basics for Every Setup
Gear helps, but what you put in the brewer matters more. Even the best dripper and kettle cannot save old beans or cold water.
A few small habits can boost the flavor in every pour-over coffee setup you try. Freshness and simple consistency are your secret helpers here.
Coffee Beans Matter Most
Start with whole coffee beans and avoid pre-ground coffee when possible. Grinding right before brewing keeps the aroma strong and prevents stale flavors from sneaking in.
Beans lose flavor quickly once broken down, so letting them sit as ground coffee is like leaving chocolate in the sun—a sad mistake.
Light and medium roasts usually shine in pour over. They give you gentle acidity, fruity notes, or chocolate sweetness that a manual brewing style can show clearly.
A Burr Grinder Keeps Things Smooth
A burr grinder helps keep your coffee grind size consistent. Blade grinders smash beans unevenly, leaving dust and chunks that brew at very different speeds.
That can cause sharp bitterness or sour notes. If you already have a grinder, try this to tune flavor:
- Too bitter → grind coarser
- Too sour or weak → grind finer
A gram scale helps track adjustments so you can repeat wins instead of guessing each morning.

Water Temperature Sets the Mood
Water temperature has a significant impact on extraction. Aim for 93–96°C (about 200–205°F). A gooseneck kettle or electric kettle with temperature control, like a Stagg EKG, makes this easy.
Water that’s too hot can taste harsh. Too cool, and it feels flat and dull. If your kettle doesn’t show the actual temperature, boil the water and wait 30 seconds before pouring.
Coffee-To-Water Ratio for Steady Results
A simple starting point is 1 gram of coffee for every 16 grams of water. Use a digital scale or gram scale for accuracy.
It saves you from wondering why Tuesday’s cup tasted like magic while Wednesday tasted like hot sadness. Once you know your preferred strength, adjust little by little.
Blooming Makes Coffee Come Alive
Blooming is the first pour. Wet all the coffee grounds with a small amount of water, wait 30–45 seconds, and watch bubbles release.
That gas comes from fresh coffee beans. It makes space for complete extraction later. If you see no bubbles at all, your beans may be older than they should be.

The Final Scoop
Pour over coffee feels rewarding because you shape the taste. The best pour over setup could be a budget Hario V60 starter kit, a smooth Chemex brewer, or a compact Kalita Wave travel plan.
You can even go premium with a Stagg EKG kettle and upgraded dripper if that makes your day brighter.
No matter the gear, fresh coffee beans, proper water temperature, and a simple brewing method bring out the flavor you want.
Keep your scale nearby, bloom with care, and adjust the coffee grind size as you learn what you like. Great coffee doesn’t hide behind price tags. It’s right there in your hands every morning.